Stage
https://www.lsoptsupport.com/examples/parameter-identification/parameter-identification/para_iden_his_multi/copy3_of_results-tabbed
https://www.lsoptsupport.com/@@site-logo/LS-Opt-Support-Logo480x80.png
Stage
Home Screen Process Flowchart
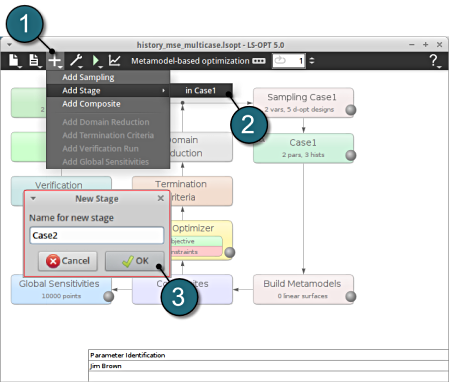
- To add a new Stage select the Add (denoted as +) at the task bar of the GUI.
- Select the Add Stage > in Case1 option. Another possibility to add a similar stage is to use the Clone option when right-clicking an already definied stage. This creates a new stage with the same definitions than the original stage, response and history names are replaced for uniqueness.
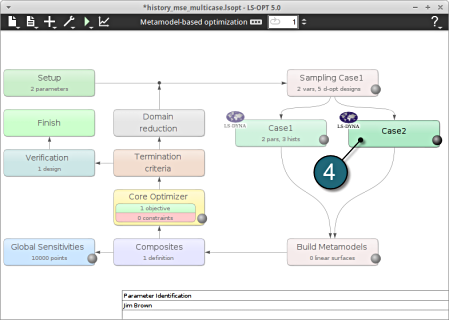
- Select a suitable name for the new stage e.g. Case2 and press OK . The main LS-OPT GUI includes a new Stage Case2 (see image below).
- Select the Case2 box.
A window Stage Case2 shall open.
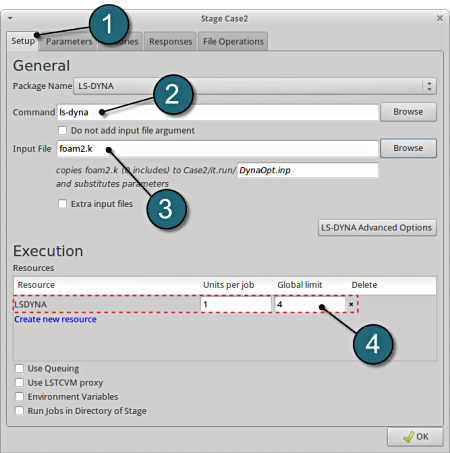
Define Input File Name and Command
- Select the Setup tab.
- For Command specify the LS-DYNA executable ls-dyna (This name can be different on your computer). On Windows, the command has to be specified using the absolute path.
- For Input File browse for the parameterized file foam2.k. Parameters in LS-DYNA input files can be definied using *PARAMETER or the LS-OPT parameter format <<>>, see Parameters tab.
- For efficient usage of the computing power of the machine, choice on handling the number of concurrent jobs can be made suitably in this section. (E.g., if the machine has 4CPUs, and to run each job on a single CPU : Units per job = 1, Global limit = 4).
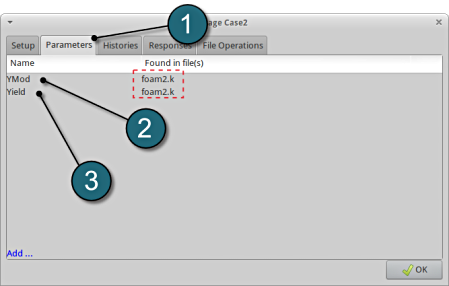
The parameters located in the selected Input File can be visualized in the adjoining tab Parameters.
Design Parameters.
- Select the Parameters tab.
- The first design parameter of the objective function located in the input file foam2.k is displayed ( Young's modulus E (YMod) of the foam material ).
- The second design parameter of the objective function located in the input file foam2.k is displayed ( Yield stress Y (Yield) of the foam material ).
Extract First History
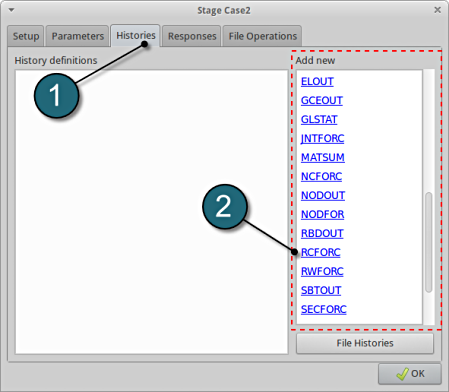
- Select the Histories tab.
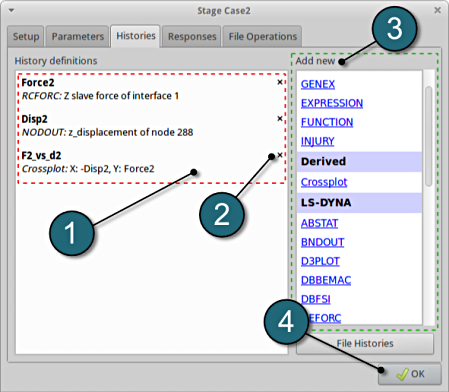
- Select the suitable History definition from the available LS-DYNA output interfaces available from the list under Add new, in this case select the option RCFORC.
A separate window emerges named, New history. This enables the user to define the history in suitable steps.
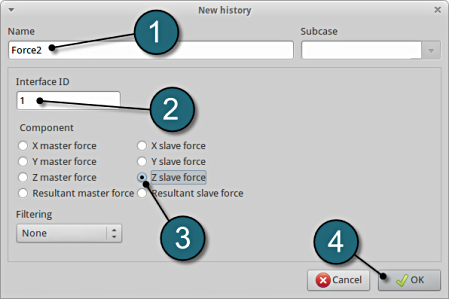
Define z-slave-force on interface 1
- Enter the label Force2 as History name.
- Enter 1 for the Interface ID.
- Select Z slave force for the Component.
- Select OK to proceed.
- This will extract the Z-slave history Force from the binary LS-DYNA output database RCFORC.
- The New history tab closes and returns to the main page of the HIstories tab in the Stage Case2 window.
Add Second History
For additional history definitions from the available LS-DYNA output interfaces available from the list under Add new, select the option NODOUT.
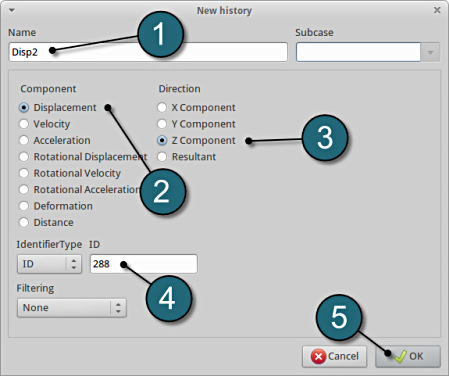
Define z-displacement of node 288
- Enter the label Disp2 as History name.
- For Component select Displacement.
- For Direction select Z Component.
- Type in the node ID: 288.
- Select OK to add the history definition.
This will extract the Z-component of the displacement at node ID 288 from the binary LS-DYNA output database NODOUT.
Add Third History
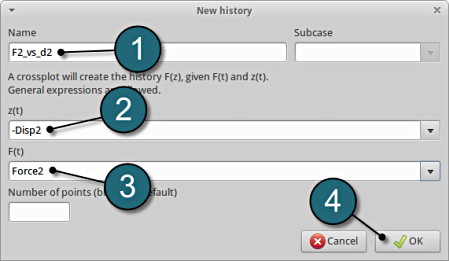
For additional history definitions, select the option Crossplot available from the list under Add new.
Define crossplot for -Disp2 and Force2
- Type in F2_vs_d2 as History Name.
- For z(t) type in -Disp2 (negative Disp2).
- For F(t) type in Force2.
- Select OK to add the history definition.
This will generate the force vs. displacement curve.
Add File History
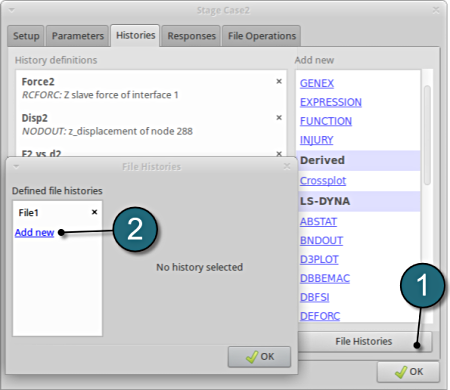
- Select the option File Histories.
A separate window emerges named, File Histories.
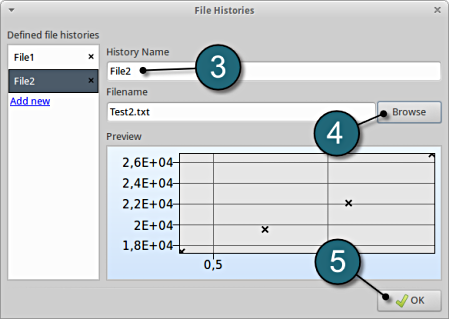
Define a history through a text file
- To define an additional file history for use as target curve select the option Add new.
- Type in File2 as History Name.
- Push the Browse button to find the file Test2.txt from your working directory (see below).
- Select OK to add the file history.
  0.36168 17393
  0.72562 19559
  1.0903  22098
  1.4538  26833
*Test2.txt file includes data for 'Displacement' vs. 'Force Resultant'.
History Review
- The defined histories can be reviewed in the tab of the Histories under the History definition. Necessary changes can be made by selecting the choice.
- To delete a History definition click on the cross button (denoted as X).
- Additional histories can be added from the choice available under the Add new list as earlier.
- Select the OK button to proceed.
