LS-DYNA
https://www.lsoptsupport.com/examples/subpages/ansa-1/copy3_of_results-tabbed
https://www.lsoptsupport.com/@@site-logo/LS-Opt-Support-Logo480x80.png
LS-DYNA
Home Screen Process Flowchart
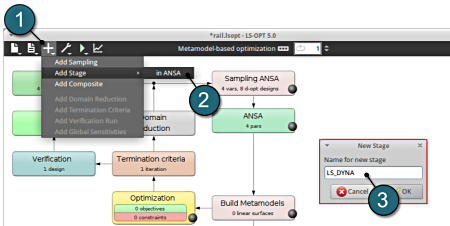
- To add a new Stage select the Add (denoted as +) at the task bar of the GUI.
- Select the Add Stage > in ANSA option.
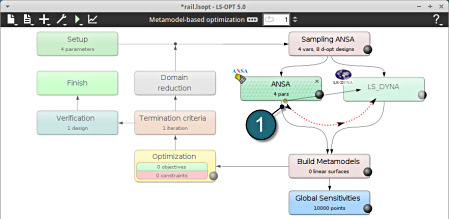
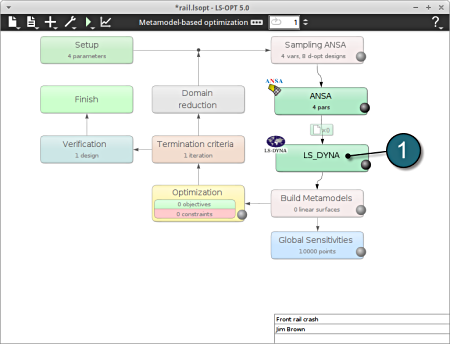
- Select a suitable name for the new stage e.g. LS_DYNA and press OK . The main LS-OPT GUI includes a new Stage LS_DYNA (see image below).
Dependencies of Stages
- The dependency of the stages is set by dragging the arrow head from the stage ANSA to the stage LS_DYNA.
The figure below illustrates the re-positioning of the new Stage LS_DYNA in the LS-OPT process flow. The stage boxed can be moved using the left mouse button to display the process chain as desired. There is also an automated option to layout the stage boxes in the Tools menu.
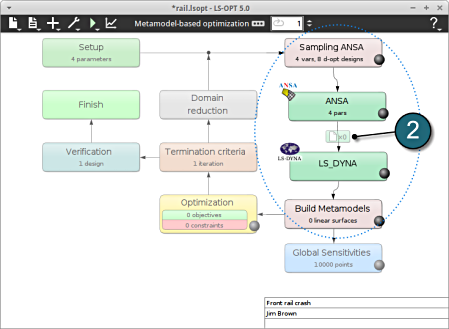
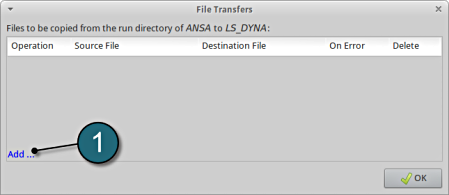
- Since the ANSA output file is used as LS_DYNA input file, the definition of a File Transfer is necessary. Select the respective icon.
A window File Transfers shall open.
File Transfers
- Select the Add.. button.
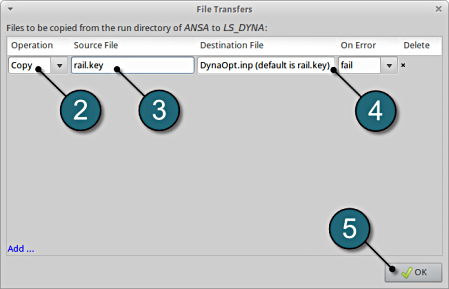
- For Operations, choose Copy.
- Enter the name of the Source File to copy from the ANSA directory to LS-DYNA. In this case enter rail.key.
- Enter the name of the Destination File to be copied to LS-DYNA. In this case enter DynaOpt.inp.
- Select OK to continue.
Now, the user can define the properties of the LS-DYNA Stage.
Home Screen Process Flowchart
- Select the LS_DYNA box.
A window Stage LS_DYNA shall open.
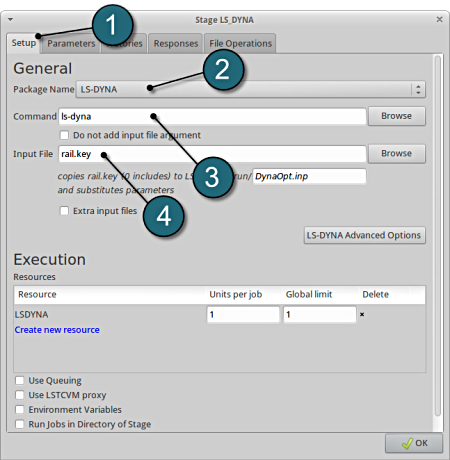
Define Input File Name and Command
- Select the Setup tab.
- Select the Package Name for the stage to LS-DYNA.
- For Command specify the LS-DYNA executable ls-dyna (This name can be different on your computer). On Windows, the command has to be specified using the absolute path.
- For Input File enter rail.key. This file is generated by the upstream stage ANSA.
Responses for Optimization
- The various responses for the optimization problem can be added by the following steps:
Add First Response
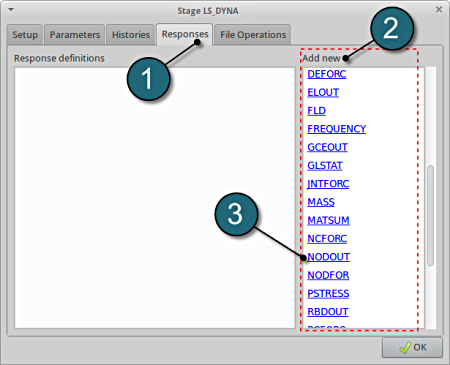
- Select the Responses tab.
- Select the suitable response type from the various option available from the list under Add new.
- For the first response select the option NODOUT , which represents an interface to LS-DYNA nodout results. Note that LS-OPT reads the results from the binout database.
A separate window emerges named; New response. This enables the user to define the response in suitable steps.
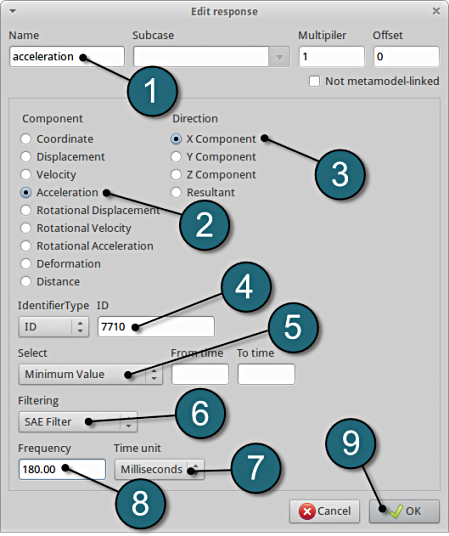
Define x-acceleration of node 7710
- For Response name enter acceleration.
- For Component select from the list Acceleration.
- For Direction select X Component.
- For node ID enter 7710.
- Select the Minimum Value option under Select. This will choose the max. value of acceleration in x-direction during the crash.
- For Filtering choose SAE Filter.
- Select Milliseconds as the Time unit.
- Enter 180.0 for Frequency.
- Select the OK button to add the response.
- The New response dialog closes and returns to the main page of the Responses tab in the Stage LS-DYNA window.
NOTE: In this case, the magnitude of acceleration is negetaive, hence its necessary to measure the minimum value.
Add Second Response
- To add an additional response select the option NODOUT from the Add new list on the Responses tab.
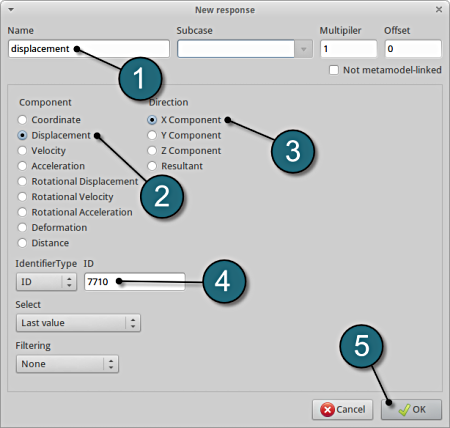
Define x-displacement of node 7710
- For Response name enter displacement.
- For Component select from the list Displacement.
- For Direction select X Component.
- For node ID enter 7710.
- Select the OK button to add the response.
- The New response dialog closes and returns to the main page of the Responses tab in the Stage LS-DYNA window.
Add Third Response
- To add an additional response select the option Mass from the Add new list on the Responses tab.
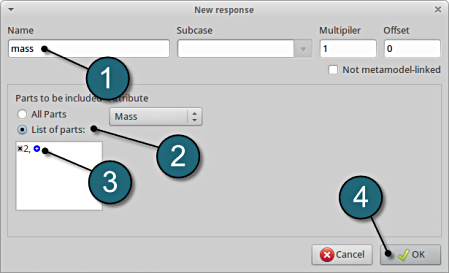
Define mass responses for structural component
- For Response name enter mass.
- For Parts to be included select List of parts.
- In the empty box underneath enter 2.
- The part ID numbers can be found in the main page of the problem description.
- Select the OK button to add the response.
- The New response tab closes and returns to the main page of the Responses tab in the Stage LS-DYNA window.
Responses Review
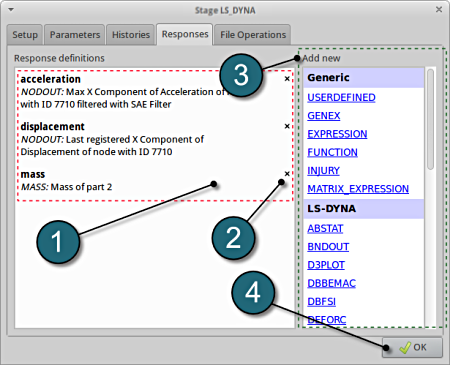
- The defined responses can be reviewed in the tab of the Responses under the Response definitions. Necessary changes can be made by selecting the choice.
- To delete a Response definition click on the cross button (denoted as X).
- Additional responses can be added from the choice available under the Add new list as earlier.
- Select the OK button to proceed.
